How to Set Up a Microsoft Office 365 Trial: Complete Step-by-Step Guide
Getting Started with Microsoft Office 365 Trial
Microsoft Office 365 (now Microsoft 365) offers a free trial that gives you access to premium productivity tools including Word, Excel, PowerPoint, Outlook, and Teams. This guide will walk you through the entire setup process so you can start using these powerful tools right away.
What You'll Get with the Office 365 Trial
Before we begin, here's what's included in your free trial:
- Full access to Office apps (Word, Excel, PowerPoint, Outlook, OneNote)
- 1TB of OneDrive cloud storage
- Microsoft Teams for collaboration
- Advanced security features
- Premium mobile apps for iOS and Android
- 30 days of free access (no credit card required initially)
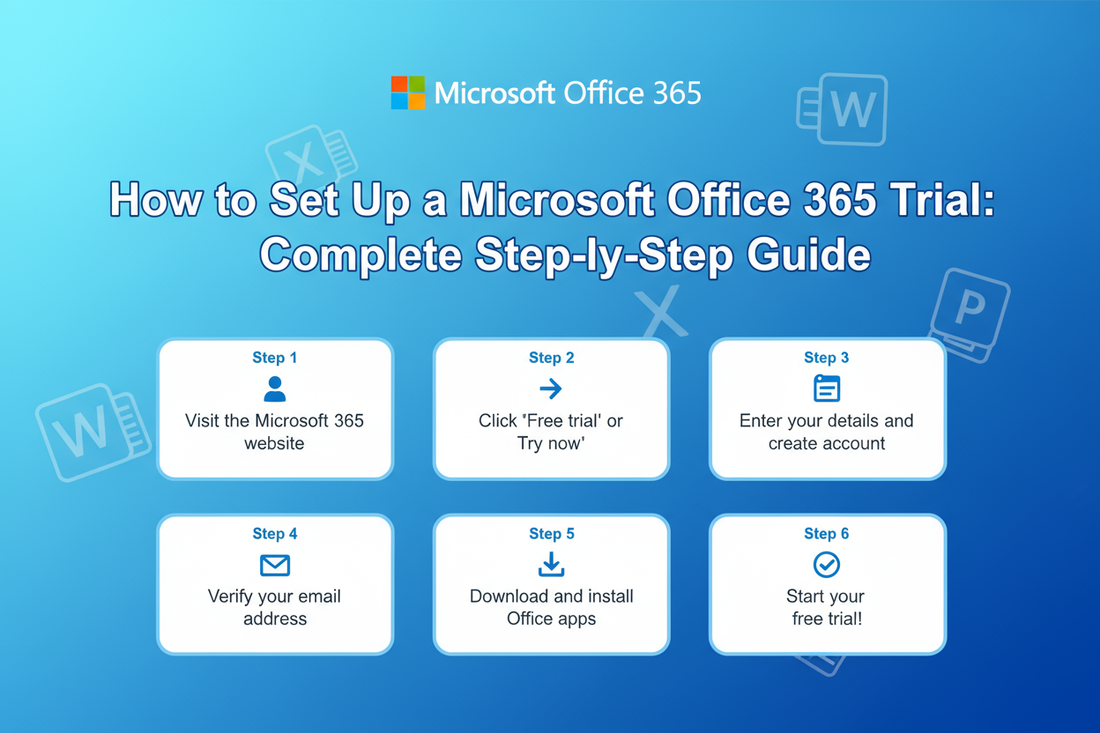
Step 1: Visit the Microsoft 365 Website
Navigate to the official Microsoft 365 website at microsoft.com/microsoft-365. Look for the "Try for free" or "Free trial" button, which is typically displayed prominently on the homepage.
Step 2: Choose Your Plan
Microsoft offers different trial options:
- Microsoft 365 Personal - For individual use
- Microsoft 365 Family - For up to 6 people
- Microsoft 365 Business - For small to medium businesses
Select the plan that best fits your needs. For most individual users, the Personal plan is ideal.
Step 3: Sign In or Create a Microsoft Account
You'll need a Microsoft account to proceed. If you already have one (from Xbox, Outlook, or Skype), sign in with those credentials. If not:
- Click "Create a Microsoft account"
- Enter your email address or create a new Outlook.com email
- Create a strong password
- Verify your email address
- Complete any security verification steps
Step 4: Enter Your Payment Information
Even though it's a free trial, Microsoft requires payment information to prevent abuse. Don't worry - you won't be charged during the trial period, and you can cancel anytime before it ends.
- Enter your credit card or PayPal information
- Confirm your billing address
- Review the trial terms and conditions
- Click "Start trial" or "Subscribe"
Important: Set a reminder for yourself a few days before the trial ends so you can decide whether to continue or cancel.
Step 5: Download and Install Office Apps
Once your trial is activated:
- Go to your Microsoft 365 account dashboard
- Click "Install Office" or "Install apps"
- Choose "Install" from the dropdown menu
- The installer will download automatically
- Run the installer file and follow the on-screen instructions
- Sign in with your Microsoft account when prompted
The installation typically takes 15-30 minutes depending on your internet speed.
Step 6: Set Up Office Apps on Mobile Devices
To use Office on your smartphone or tablet:
- Download the Microsoft 365 app from the App Store (iOS) or Google Play Store (Android)
- You can also download individual apps like Word, Excel, or PowerPoint
- Open the app and sign in with your Microsoft account
- Your premium features will automatically activate
Step 7: Configure OneDrive Cloud Storage
Your trial includes 1TB of OneDrive storage:
- OneDrive should install automatically with Office
- Look for the OneDrive icon in your system tray (Windows) or menu bar (Mac)
- Sign in with your Microsoft account
- Choose which folders to sync
- Start uploading your files to the cloud
Step 8: Explore Microsoft Teams
Microsoft Teams is included with your trial for video calls and collaboration:
- Open Teams from your Office apps menu
- Sign in with your Microsoft account
- Set up your profile with a photo and status
- Invite team members or colleagues to collaborate
Tips for Making the Most of Your Trial
- Test all the apps: Try Word, Excel, PowerPoint, Outlook, and OneNote to see which ones you'll use most
- Use cloud features: Save documents to OneDrive to access them from any device
- Try collaboration tools: Share documents and use real-time co-authoring
- Explore templates: Microsoft offers thousands of free templates for documents, spreadsheets, and presentations
- Set up email: Connect your email accounts to Outlook for unified inbox management
How to Cancel Before the Trial Ends
If you decide Office 365 isn't for you, here's how to cancel:
- Go to account.microsoft.com
- Sign in and navigate to "Services & subscriptions"
- Find your Microsoft 365 subscription
- Click "Manage" then "Cancel subscription"
- Follow the prompts to confirm cancellation
You'll retain access until the end of your trial period even after canceling.
Troubleshooting Common Issues
Installation problems: Make sure you have administrator rights on your computer and enough disk space (at least 4GB free).
Activation errors: Sign out and sign back in to your Microsoft account, or try restarting your computer.
Can't find the download: Check your Microsoft account dashboard at office.com and look for the "Install Office" button.
Final Thoughts
Setting up your Microsoft Office 365 trial is straightforward and gives you access to industry-leading productivity tools. Take advantage of the 30-day period to explore all the features and decide if it's worth the investment for your personal or business needs.
Remember to set that cancellation reminder if you're unsure about continuing after the trial!